Charles has been writing about games for years and playing…
Learn 2018’s Best OBS Studio Settings Tutorial for 720 P/1080 with 60 fps. These settings will give you amazing quality for your gaming streams when broadcasting your content to services like YouTube Gaming, TwitchTV, Facebook. You can follow the twitch thread here on reddit /r/Twitch.
Twitch provides the facility to record the live videos, or in other words, it is a live streaming video platform. There are newcomers from all over the world who try their luck in live streaming. Twitch is an amazing source of broadcasting, but it comes with several issues too, and in this article, we will learn how you can overcome Twitch troubles by taking it to the best OBS settings.
Table of Contents
ToggleWhat Is OBS?
OBS means Open Broadcaster Software that works as a supporter for Twitch because any online video platform that is used to stream videos requires a software. This software works as an encoder that encodes the videos in the proper format so you can put them for streaming. OBS is considered as one of the best Broadcaster Software As it supports the wide range of platforms such as Mac, Windows, or Linux.
OBS brings some great features that act as a great package for beginners as well. Her you get several abilities on your video streaming like custom transitions, correction tools, different filters on audio and video, blending, and much more. This way, the software is a great tool for the streaming needs, but the newbies can get a bit confused on setting it to several aspects. For The purpose just read out the content mentioned below and get to know how to set up OBS for your Twitch account.
If you are interested in games, You can also check out the pubg reshade settings and best settings for fortnite.
How to Setup OBS
- After installing OBS, open the program and choose Yes to start the Auto Configuration Wizard. This will let us configure the OBS a little bit before we start on more detailed settings.
- Select “Optimize for streaming”
- On the next window Video Settings, leave everything on default. Their configuration will need extra information.
- Get your stream key from Twitch as instructed in our “OBS Streaming Settings” section.
- After Auto Configuration Wizard, it is time to choose a server. Go to Settings, then Streaming
- You can select the Twitch server closest to you, but this will not be the best option every time. For this, you can download a free tool called Twitch Bandwidth Test Tool.
- After you download it, run the program and enter your Stream Key, choose your region and select Long on the Test Duration drop-down menü.
- Start testing.
- After it is complete, choose the server with the highest bandwidth with a quality over 80. RTT latency isn’t much of an importance here.
- Select this server on the OBS from Settings and Stream tab.
This how you set up OBS initially.
Best OBS Settings For Twitch
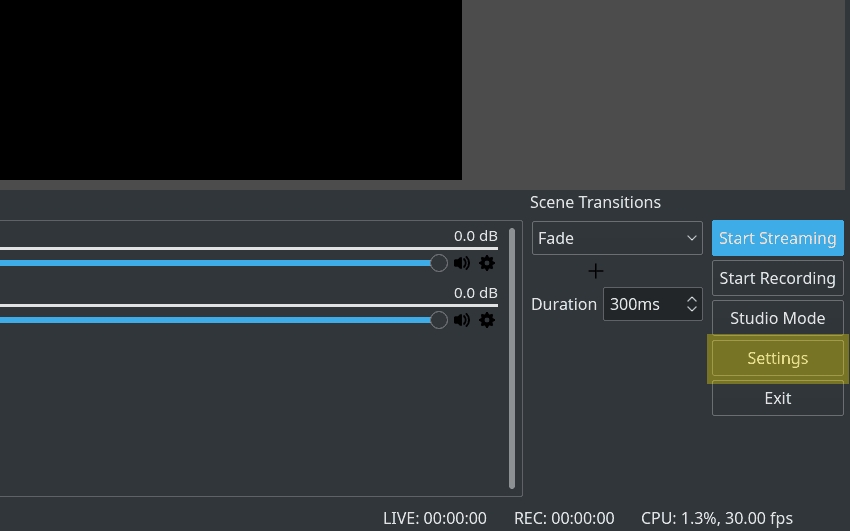
Open up the OBS Studio and head to the bottom-right area. There you see the section Settings that you need to click.
Best OBS Video Capture Settings
You know how to bring up those settings, so now you need to go to the Video section as you see in this screenshot. There you will find some fields that need to be adjusted for the best video capturing or recording.
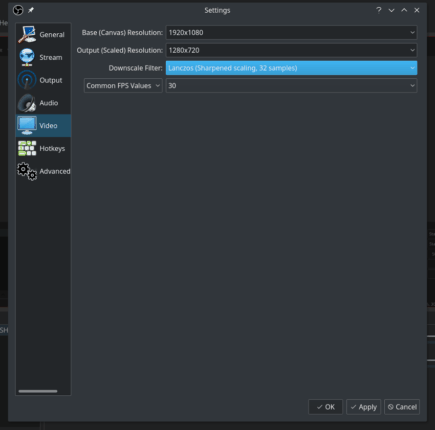
- The first section is the Base (Canvas) Resolution that means it is the resolution of your screen. This indicates the screen in pixels in which you want to record. You can set to any resolution you want, small or significant and you can enter it manually too. For manually entering you have to type width and height as per your choice.
- The second section is the Output (Scaled) Resolution, and this refers the resolution of the recorded video. So if you want a high-quality video then you can set it to 1920*1080 or for a normal video, keep it 1280*720.
- Now, the third section is named as Downscale Filter where you can apply the filter for downscaling. For the recorded videos, it is best to apply Lanzos, and for the live streaming, you can select other available options.
- Finally, the fourth part is Common FPS Values that is frames-per-second. Usually, it remains 30 frames per second, but if you want a different frame rate, then you can experiment with it until you achieve the desired one.
Best OBS Video Output Settings
Having best output settings means having the ultimate quality of video. So, choose the fields carefully. By default, the sections are not set to an advanced mode, and so it looks like this:
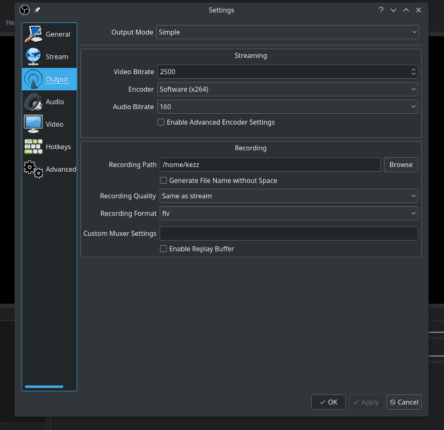
- We want the settings to be at an advanced level so choose the Output section that is third one in the Settings menu.
- Now, in the first option that is Output mode select it as Advanced instead of Simple from the dropdown list.
- Once you do that, you see three tabs named as Streaming, Recording, and Audio.
- First head to Recording tab, this section means setting up the path where you want your videos to be saved.
- Next, go to the format and set it to MP4
- For the Encoder section, make it to Use stream encoder and just left all other options as it is.
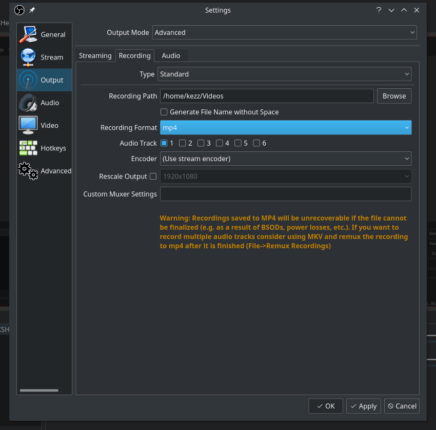
Note: the recording format can be as per your need. MP4 works best in most situations so you can set it to that else make it MOV or MKV.
Best OBS Studio Streaming Settings for Screen Recording
- Now, you need to come to the first section that is Streaming.
- Here you will see fields like Bitrate and CPU usage that you need to edit.
- So make the Bitrate section to 12000 and the CPU usage to ultrafast.
- Also, select the x264 encoder field.
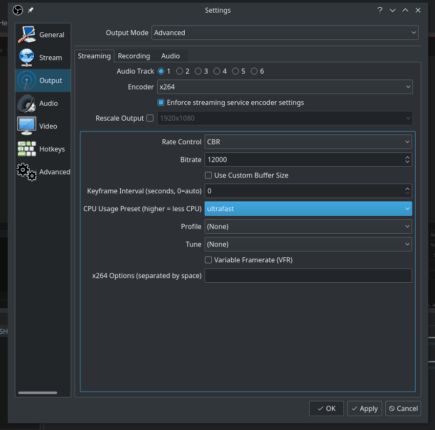
Any other options that you see do not need any editing, and you can leave them at default settings.
OBS Recording Settings
To configure OBS recording settings, go to Settings, and then to Output tab and select “Advanced” on Output Mode. On there, click on the recording tab. This will bring up a list of options.
- First of all, select a recording path. This is the location where your OBS will store your captured videos.
- Update the recording format to MP4 since this is the best one.
- Select x264 on Encoder.
- Set rate control to CBR and set bitrate according to your PC. If you have low-end PC, you can set the bitrate around 10000-15000. If your PC is stronger, you can up the number and see if it impacts performance.
OBS Streaming Settings
Before you stream in any broadcast website, you need to enter a stream key to OBS. There are many different stream services but I will cover how to get the stream key from Twitch if you haven’t run Auto Configuration Wizard when you first opened OBS Studio.
- Go to twitch.tv and login to your account
- Click on your avatar.
- Click on the dashboard.
- Select the channel under the settings header from the menü on the far left.
- Choose the stream key button.
- Click on “Show Key”.
- Copy the text.
Now you need to enter this stream key into OBS.
- Click on Settings in the main window.
- Select the “Stream tab” from on the left.
- Paste your stream key.
- Select your streaming service.
- Click OK.
What is a good bitrate for OBS?
| Quality | Resolution | Video Bitrate | Audio Bitrate | Audio Sample Rate | Frames Per Second | Video Codec | h.264 Profile | Keyframe interval | Audio Codec | Audio Channels |
| Low | 480×270 | 400kbps | 64kbps | 48kHz | 25 / 30 | h.264 | Baseline | 1 Second | AAC-LC | Mono |
| Med | 640×360 | 800 – 1200 kbps | 96kbps | 48kHz | 25 / 30 | h.264 | Main | 1 Second | AAC-LC | Mono or Stereo |
| High | 960×540 / 854×480 | 1200 – 1500 kbps | 96kbps | 48kHz | 25 / 30 | h.264 | Main | 1 Second | AAC-LC | Mono or Stereo |
| HD 720 | 1280×720 | 1,500 – 4,000 kbps | 128kbps | 48kHz | 25 / 30 | h.264 | Main | 1 Second | AAC-LC | Mono or Stereo |
| HD 1080 | 1920×1080 | 4,000-8,000 kbps | 192kbps | 48kHz | 25 / 30 | h.264 | Main or High | 1 Second | AAC-LC | Stereo |
| 4K | 3840×2160 | 8,000-14,000 kbps | 192kbps | 48kHz | 25 / 30 | h.264 | High | 1 Second | AAC-LC | Stereo |
Your recommended encoding settings on OBS will depend on the quality of your stream. For example, a 720p broadcast may require a bitrate around 1,500 – 4,000 kbps depending on your bandwidth and your PC’s processing power.
But as your resolution and frames per second go up, that number will change significantly, at the same time will demand more bandwidth.
A 1080p 60 FPS stream may require up to 8,000 kbps and a 4K stream can go up to 14,000 kbps. Best you can do is play between these parameters until you find the sweet spot specific to your bandwidth, CPU power and stream quality.
Streaming a Game with OBS Studio
If you are going to broadcast a video game with OBS Studio, you can set up OBS to start capturing as soon as you boot up a game. To do this, simply click on the + under the Sources tab and select Game Capture.

On the opened window, select your game executive file under the Window drop-menu, and click OK.
Advanced Settings for OBS Studio
Finally, you can make some fine adjustments on the Advanced tab. Choosing Above Normal can give you a small boost in performance. Also, you can change your YUV color space to 709 and YUV color range to Full under Video, since I found that these OBS settings look best.

Stream Delay can be really useful if you are streaming something that you do not want your viewers to see live, such as a multiplayer video game to prevent stream sniping.
Assigning Hotkeys for OBS Studio
Even though OBS Studio is a great free streaming program, it is rather complex and it can take some time to master it and navigating through its menus everytime you want to perform a certain action can eat up your time. To prevent this, you can assign hotkeys in the Hotkeys section on the Settings tab.

From starting/stopping streaming/recording to muting desktop audio, you can assign keys to practically any action.
Bonus: Check your Twitch stream for bitrate and FPS stability, dropped frames, bad audio or video quality and other common configuration problems at Twitch Analyzer.
Conclusion
All these sections are necessary to get different and better changes in your recordings with OBS Studio. Well, if you are more like an experimental person, then you can tweak other settings too and make it right just as you want it. Else, just follow with the article and make your OBS settings accordingly.
Charles has been writing about games for years and playing them all his life. He loves FPS, shooters, adventure games like Dota 2, CSGO and more.


