




As AI anime generators become even more capable, we’ve seen several release mobile apps. But given the technicalities involved in AI anime generation, are these apps capable enough, and where do you even start in the limited workspace?
You have to choose models, write prompts, upload reference images, and adjust lots of settings, which can make the first screen feel more complicated than the image you had in mind. The good news is that you don’t need to figure everything out before making your first generation.
A better approach is to build the image in stages. Start with the character and scene, see what the model gives you, then use the result to decide what needs more control. From there, you can try another model, add a reference or LoRA, and keep developing the image without leaving your phone.
In this guide, we’ll use PixAI’s mobile workflow to follow that process from the first prompt to a finished anime illustration.
What you need to create AI anime art on your phone
You don’t need much to get started. The main thing is having a clear idea of what you want to see and an app that gives you enough control to turn that idea into an image.
An anime AI app
Choose an app that gives you access to anime-focused models and lets you adjust your generation without making the process overly complicated. As you get further into a project, features such as references, LoRAs, and image continuation become useful, so consider the ones that an app offers.
A clear idea for your image
Start with a character, what they’re doing, where they are, and how you want the scene to look. You can add more detail once you see the first result.
To illustrate this, you can use a natural language prompt or a tag-based prompt. Some models and platforms like PixAI work well with both, but others only work best with tag-based prompts.
A reference image, if you need one
Keep useful visual material on your phone if you already have it. A character sketch, outfit design, screenshot, or composition reference can give the generator information that’s difficult to communicate through words alone.
You can start without a reference and add one later if the first generations aren’t giving you enough control. Note that you can also create a character and use it as your reference.
How to create AI anime art on your phone
The easiest way to learn the workflow is to build with one character from start to finish. You don’t need to understand every setting before you begin. Start with the parts of the image you can describe clearly, then use each generation to decide what you want to change.
Step 1: Start with a simple anime concept
Before you write your prompt, decide what you want the image to show. Start with four things:
- Character: Who are you creating?
- Action: What are they doing?
- Setting: Where does the scene take place?
- Visual direction: What should the image feel or look like?
For example, you could start with a young girl in a school uniform standing beneath cherry blossom trees on a spring afternoon. You might picture a navy-blue uniform, a school bag over one shoulder, falling petals, and a quiet path leading through the school grounds.
You don’t need to describe every detail yet. The first generation gives you something concrete to react to, which makes it easier to decide what needs more attention in the next prompt.
Step 2: Write a prompt that gives the model enough direction
Once you know what you want to create, turn those ideas into a prompt. Start with the details that have the biggest effect on the image: the character, clothing, action, setting, and composition.
For our example, that could look like this:
Anime illustration of a young girl with shoulder-length dark brown hair, wearing a navy-blue school uniform and carrying a school bag over one shoulder. She stands beneath cherry blossom trees on a spring afternoon, looking along a quiet path through the school grounds. Pink petals are falling around her, with warm sunlight filtering through the branches. Full-body composition, three-quarter view, traditional anime style.
Notice how the prompt gives the generator a clear subject and scene without trying to control every possible detail.
Here’s what that looks like in PixAI:
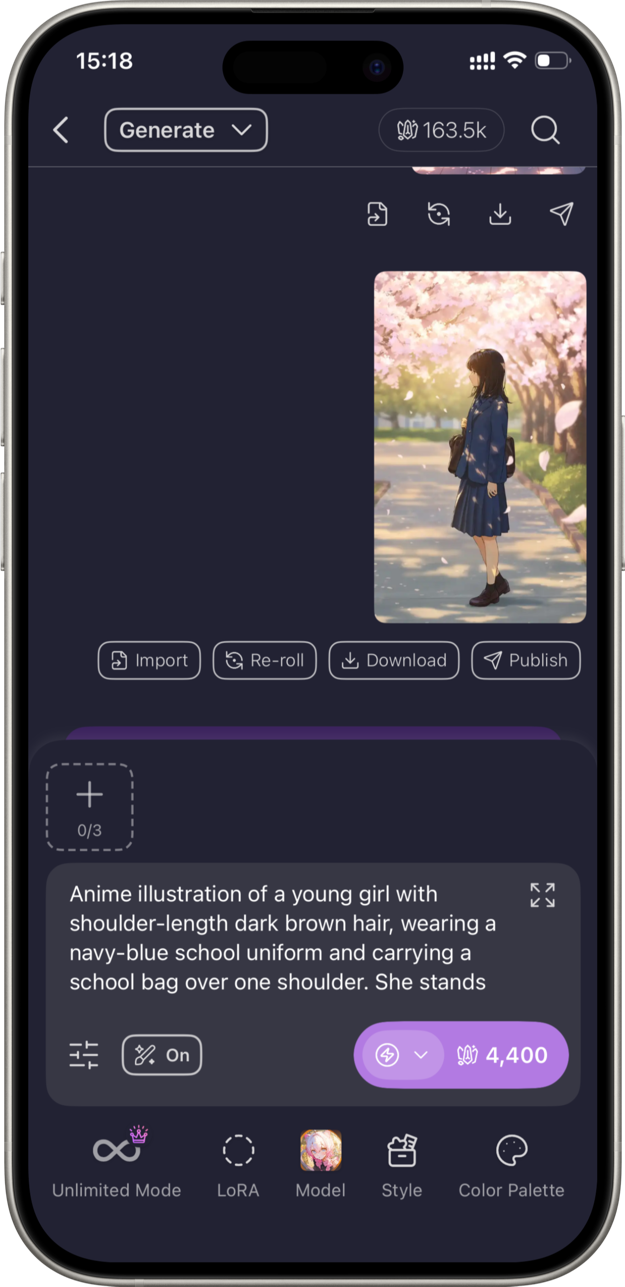
Once you see the first result, you can decide what needs to change or become more specific.
Step 3: Choose an anime model
If your app gives you several anime models, try a couple with the same prompt before changing anything else. Different models can interpret the same character and scene quite differently, from the way they draw faces and hair to how they handle backgrounds and lighting.
Start with a model that matches the style you’re looking for, then generate your image and compare the result with another suitable option. Keeping the prompt the same makes the difference between the models easier to see.
For example, let’s use the schoolgirl prompt with PixAI’s Tsubaki.3 and Haruka v2 models and compare how each one handles the character, the cherry blossoms, and the overall composition.
You don’t need to find the “best” model at this stage. You’re learning which models give you the kind of results you want, so you know where to start when you create your next image.
One thing you’ll notice is that even with multiple generations, models will still interpret prompts differently. For example, in the generation above, Tsubaki.3 interprets “looking along a quiet path” as a sideways angle (and rightly so), but Haruka v2 doesn’t. Its character is also walking instead of standing.
Step 4: Add more control with a LoRA or reference
Once you have a character you like, you may want the next generation to follow a specific character design or visual style more closely. This is where a LoRA or reference image can help.
If you’re using a LoRA, choose one that fits what you’re trying to achieve, such as a particular character or art style. If you’re using a reference image, upload something that shows the character, outfit, pose, or visual details you want the generator to follow.
For our example, we can regenerate our character using Tsubaki.3, but now with a chibi LoRA added.
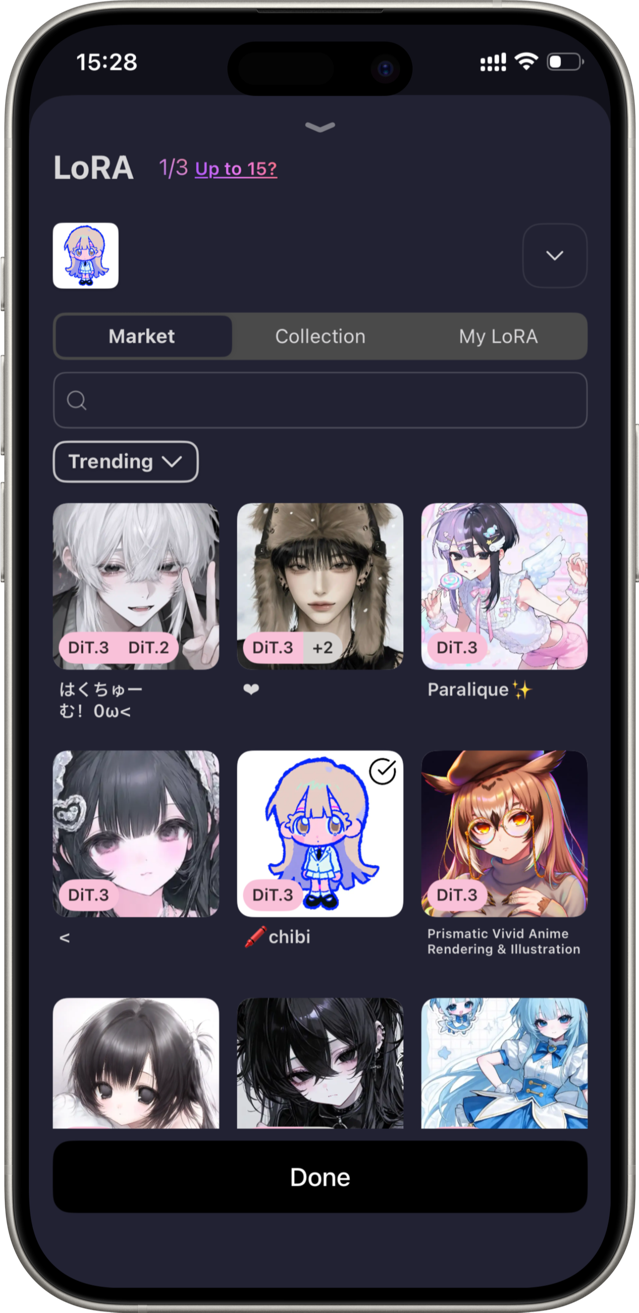
The character and art style now completely changes.
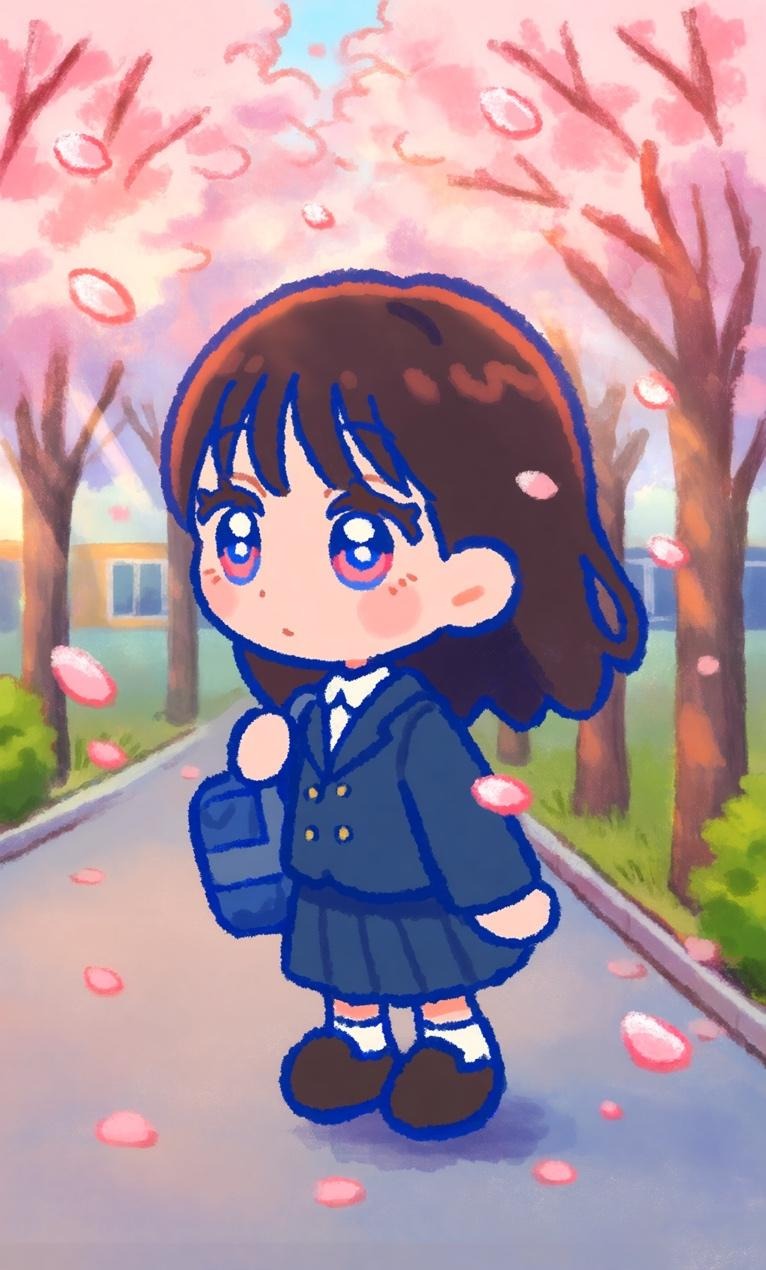
You don’t need to add a LoRA or reference to every generation. Use one when the prompt alone isn’t giving you enough control over the details that matter.
Step 5: Make your first iteration
Your first generation gives you something to work with. Instead of rewriting the entire prompt, pick one part of the image you want to improve and change that first.
For example, you might be happy with our original Tsubaki.3 character, but now you want her facing the camera. Just add the first image as your reference and write what you want to change.
In this case, all we need to do is add the image and write “The girl is now walking while facing the camera.”
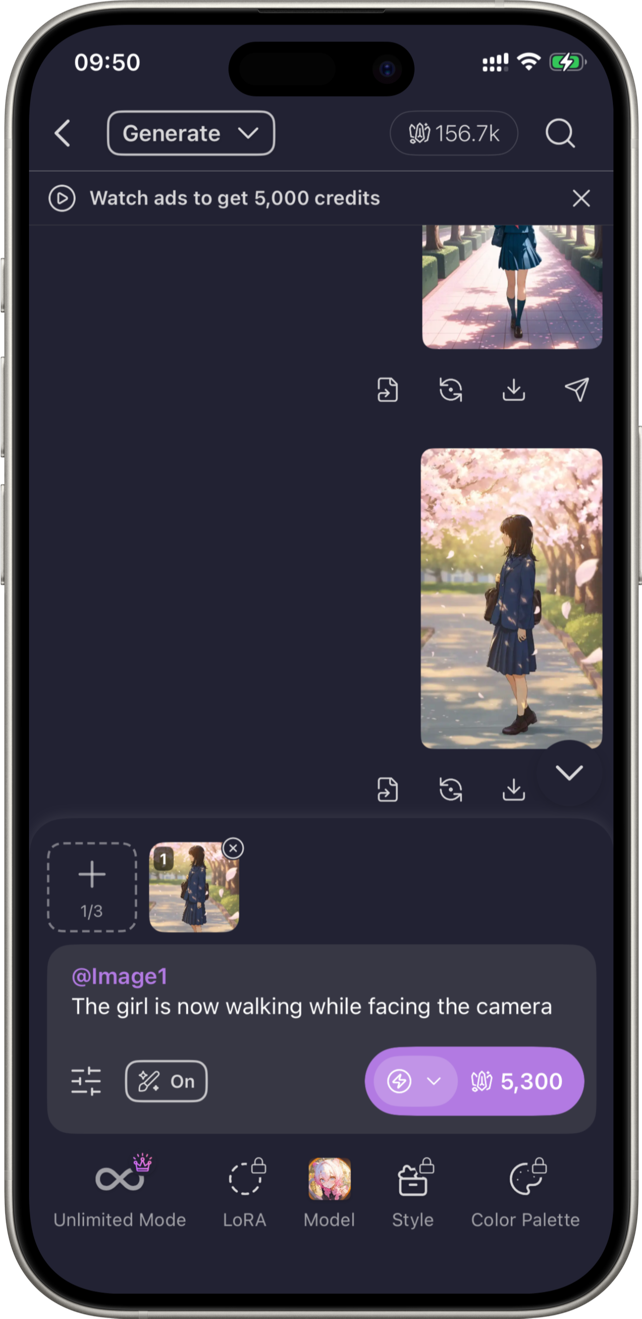
PixAI takes the original camera and setting, then changes the character based on your description.
You can do this to change a character’s appearance or take them from one scene to another.
Step 6: Keep the character consistent
Once you’ve created a character you like, try placing them in another scene instead of starting over with a completely new design.
For example, take the schoolgirl from the first image and move her from the school grounds to a quiet train platform at sunset. Keep the character details that define her, then change the setting and what she’s doing.

If your app supports references or character-focused LoRAs, use them here to help carry those details into the new image. The goal is to see which parts of the character remain consistent and which ones you may need to reinforce in your prompt.
For example, we can use the reference style we used in the previous section to put the character in a library.
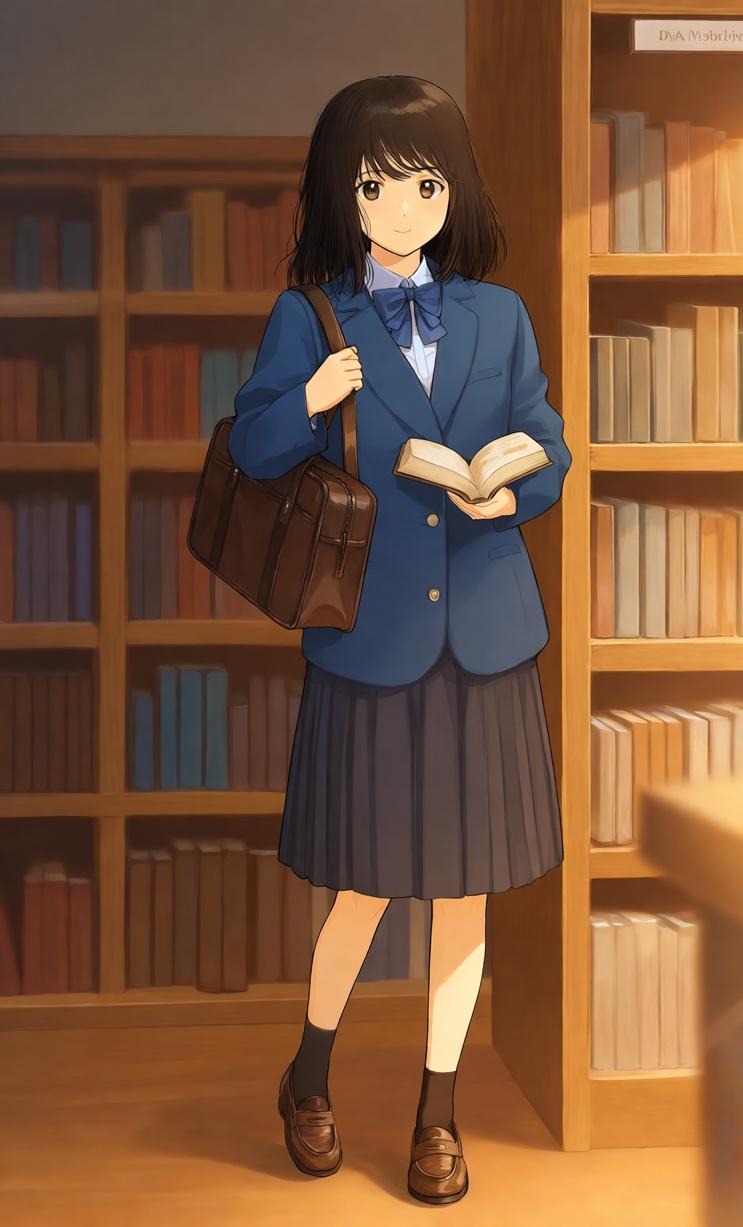
This is where an AI anime workflow starts becoming more useful for character projects. You can develop one character across different situations instead of creating a new version from scratch each time.
Step 7: Save and organize your artwork
Once you start generating several versions, keep the ones you want to develop further. Don’t rely on your phone’s gallery alone if the app gives you a way to find previous creations. Use the platform’s Library section to create collections based on projects and favorite your best artworks.
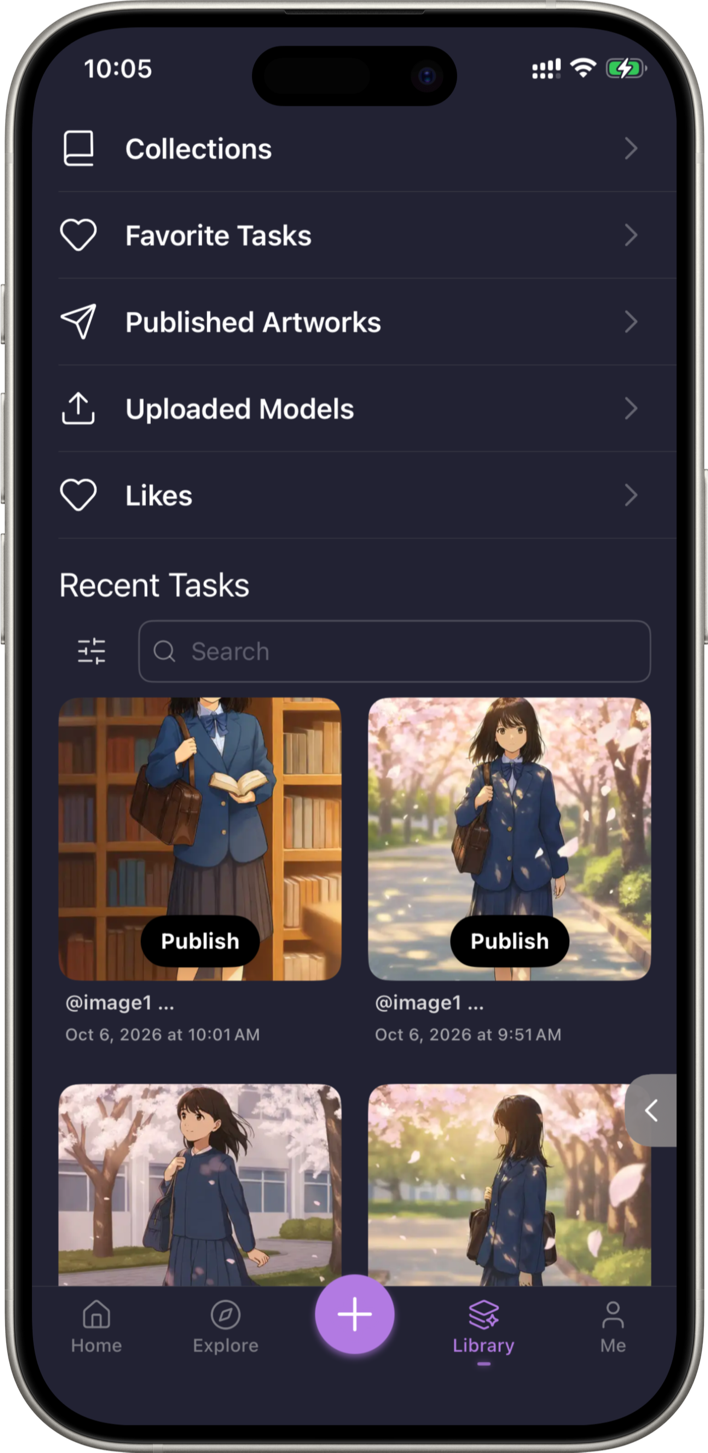
This becomes especially helpful when you’re developing a character and want to return to an earlier version later.
Common beginner mistakes when creating AI anime art on a phone
Your first few generations are also a chance to learn how the app responds to your instructions. A few habits can make that process much more frustrating than it needs to be.
- Starting with an overloaded prompt: Adding every detail you can think of at once makes it harder to tell which instructions are affecting the result.
- Changing everything at once: Change one important element at a time so you can see what actually improved the image.
- Expecting the first generation to be final: Treat the first result as a starting point and refine the parts that aren’t working.
- Ignoring references: When a character or design needs to look a particular way, a good reference can communicate details that are difficult to describe in words.
- Generating without saving good results: Keep versions that work before experimenting further, especially when you’ve found a character design or composition you want to build on.
The more you treat each generation as part of a process, the easier it becomes to figure out what to change next.
Where phone-based AI anime creation works best
Creating AI anime art on your phone works particularly well when you want to develop an idea in short sessions rather than sit down for a long desktop workflow.
- Character exploration: Try different outfits, expressions, poses, and hairstyles while you’re still figuring out a character’s design.
- Original character development: Build several scenes around the same character and use references or LoRAs when you need more consistency.
- Social content: Create illustrations for posts, profiles, thumbnails, or other visual content without moving the project between devices.
- Quick visual experiments: Turn an idea into an image as soon as it occurs to you, then save the result and come back to it later.
- Developing ideas before a larger project: Explore characters and scenes on your phone before moving the work into a more involved desktop workflow.
The biggest advantage is having a creation workflow available wherever you are, even when your main computer isn’t nearby.
When you may want to move to desktop
Your phone can handle a lot of anime creation, especially when you’re experimenting or working on individual images. A desktop becomes more useful when the project starts demanding more space and more moving parts.
- Using advanced features: Mobile apps are geared toward simplicity, so they often lack the advanced controls available on desktop.
- Comparing many generations: A larger screen makes it easier to review several results at once.
- Writing and refining long prompts: A physical keyboard and larger workspace can be more comfortable for detailed prompt work.
- Managing complex workflows: Multiple references, generations, and editing steps are easier to keep visible and organized.
- Working on larger projects: A desktop gives you more room to manage a bigger collection of artwork and assets.
You don’t have to choose one or the other. Your phone can be where you capture ideas and develop images, while a desktop can take over when the project needs a larger workspace.
Where PixAI fits
If you want to create anime artwork from your phone, PixAI gives you room to start with a basic prompt and add more control as your project develops. You can experiment with different models, bring in a LoRA or reference, and keep refining images as you learn what works for your characters and scenes.
For first-time creators
You can start with a straightforward prompt and learn by comparing your generations. As you become more comfortable, you can introduce model switching, references, and other controls rather than trying to learn everything at once.
For original character projects
If you’re developing an original character, the workflow can grow with the project. References and LoRAs can help you carry important character or style details into new images as you explore different scenes.
For creators working from their phone
The mobile workflow is particularly useful when you want to create in short sessions, develop an idea while you’re away from your computer, or keep working from images already saved on your phone.
If you’re just getting started, a useful approach is to begin with one character and one scene, then add more control as you discover what your images need.
Final thoughts
Creating AI anime art on your phone doesn’t have to mean learning every model, setting, and control before you make anything. Start with a character and a scene, generate a first version, and use that image to decide what you want to change.
From there, you can experiment with different models, add a reference or LoRA when you need more control, and develop the character across new scenes. PixAI’s mobile app gives you room to follow that progression from a basic generation to a more involved workflow.